
What if the simple swipe-and-go method you've been using is the very reason your arches fall flat by noon? Most beauty enthusiasts struggle with brows that lose their shape or develop that dreaded white "dandruff" flaking by mid-day. You've likely noticed your product sliding right off because of invisible foundation residue. It's frustrating to invest time into your routine only to have it melt away. Learning how to use brow gel like a professional artist requires a shift in perspective, moving away from surface-level styling toward a more intentional, structural approach.
You deserve a look that stays locked in place for 24 hours, even through high humidity and long commutes. This guide shares the industry secrets to a perfectly sculpted, "soft laminated" finish that looks natural rather than rigid. We'll explore the 360-degree coating technique, a method that saturates every hair from every angle to ensure a bulletproof hold. From the "surgically clean" prep phase to the final upward brush of the BrowZing Brow Gel, you'll gain the confidence to create a high-performance, fluffy brow that won't budge. Let's transform your daily routine into a professional ritual.
Key Takeaways
- Stop the "Swipe and Pray" habit by identifying the common skincare residues that cause product slippage and midday drooping.
- Master the professional 360-degree coating technique to learn exactly how to use brow gel for a multi-dimensional, "soft laminated" look that lasts.
- Implement the "Back-Brush" method to saturate the underside of each hair, ensuring your style remains structurally sound from morning to night.
- Solve the mystery of white flaking by perfecting your application layers and selecting polymer-rich formulas that defy high humidity.
- Experience the Ashunta Sheriff BrowZing Ritual, a professional secret that combines hair-nourishing ingredients with the power of a high-performance finishing sealer.
Why Your Brow Gel Isn’t Holding (And the Professional Fix)
Think of your face as a masterpiece. Your brows are the architectural anchor, the frame that defines the entire composition. If the frame is weak, the masterpiece loses its impact. In the world of professional artistry, brow gel is never an afterthought. It is the essential finishing sealer. Yet, many struggle to maintain that crisp, lifted look past their morning coffee. Why? Because most beginners fall into the "Swipe and Pray" trap. They apply a single, superficial layer of product and hope it defies the laws of physics. It won't. To truly master how to use brow gel, you must understand that your brow hairs are constantly battling two invisible enemies: gravity and natural skin oils.
Your skin produces sebum throughout the day. These natural oils act as a solvent, slowly dissolving the bonds of your makeup. When you combine this with the weight of the hair and the pull of gravity, it’s no wonder your arches begin to droop by noon. Modern modern eyebrow modification has evolved far beyond simple pencils. We now prioritize structural integrity. As your Visionary Mentor, I want you to stop seeing brow gel as a "top coat" and start seeing it as the foundation of your brow's silhouette.
The Science of a 'Crunch-Free' Hold
High-performance formulas have come a long way from the stiff, flake-prone resins of the past. Today, we utilize flexible polymers. These sophisticated molecules wrap around the hair shaft, providing a firm hold that moves with your expressions rather than snapping. It is a common misconception that more product equals a better hold. In reality, excessive product leads to "dandruff" flaking and a heavy, artificial appearance. Professional results come from strategic distribution. You want a smudge-proof finish that locks the hair in place while maintaining the soft, touchable texture of natural hair. It's about precision, not volume.
The Difference Between Grooming and Sculpting
There is a distinct difference between simply grooming your brows and truly sculpting them. Grooming is about neatness; it's a quick brush-through to align the hairs. Sculpting, particularly the coveted "laminated" look, requires a different mindset. In this context, brow gel acts as scaffolding. It provides the internal support necessary to lift the hairs upward and outward, creating a fuller, more youthful appearance. Understanding how to use brow gel as a sculpting tool allows you to manipulate the shape of your face, opening up the eye area and creating a lifted effect. We are moving away from basic application and stepping into the realm of professional artistry, where every stroke is intentional.
Step 1: The 'Clean Slate' Prep for Maximum Adhesion
Before you even reach for your product, you must address the invisible barrier sitting on your skin. Most enthusiasts fail at how to use brow gel because they apply it directly over foundation, concealer, or a rich morning moisturizer. These products are the silent killers of longevity. They contain oils and emollients designed to keep your skin supple, but those same ingredients act as a lubricant that prevents the gel from gripping the hair shaft. If your gel slides off or loses its hold by lunch, residue is almost certainly the culprit.
The first professional secret is the dry spoolie lift. Take a clean, dry spoolie and brush through your brows with firm, short strokes. This action dislodges trapped setting powder, foundation particles, and microscopic skin flakes that accumulate during your base routine. By clearing this debris, you create a pristine surface for the polymers to bond. Adhering to cosmetic safety guidelines starts with clean tools and a clean canvas. It ensures that your product remains uncontaminated and performs at its peak professional standard.
How to Degrease Your Brows Without Ruining Your Foundation
Precision is everything when you are working around a finished base. Saturate a pointed Q-tip with a small amount of oil-free micellar water or a gentle toner. Carefully trace the shape of your brow, wiping only the hair and the skin directly beneath it. You must wait at least 30 seconds for the area to dry completely. Any remaining moisture will dilute the formula and compromise the hold. When you finally apply your setting spray, use your hand or a small card to shield your brows. This prevents the spray's humectants from softening the brow gel you worked so hard to set.
Pre-Grooming: The Art of the Spoolie
Once the area is clean and dry, brush your hairs into their natural growth map. This allows you to see the true silhouette and identify any sparse areas. If you find gaps, this is the moment to use a Precision Liner Pen to create hair-like strokes before the gel locks everything down. Brow mapping is the essential blueprint for your final look, ensuring balance and symmetry before the sculpting begins. Mastering how to use brow gel effectively means understanding that the preparation is just as vital as the application itself. It is the difference between a look that fades and one that commands the room all day.
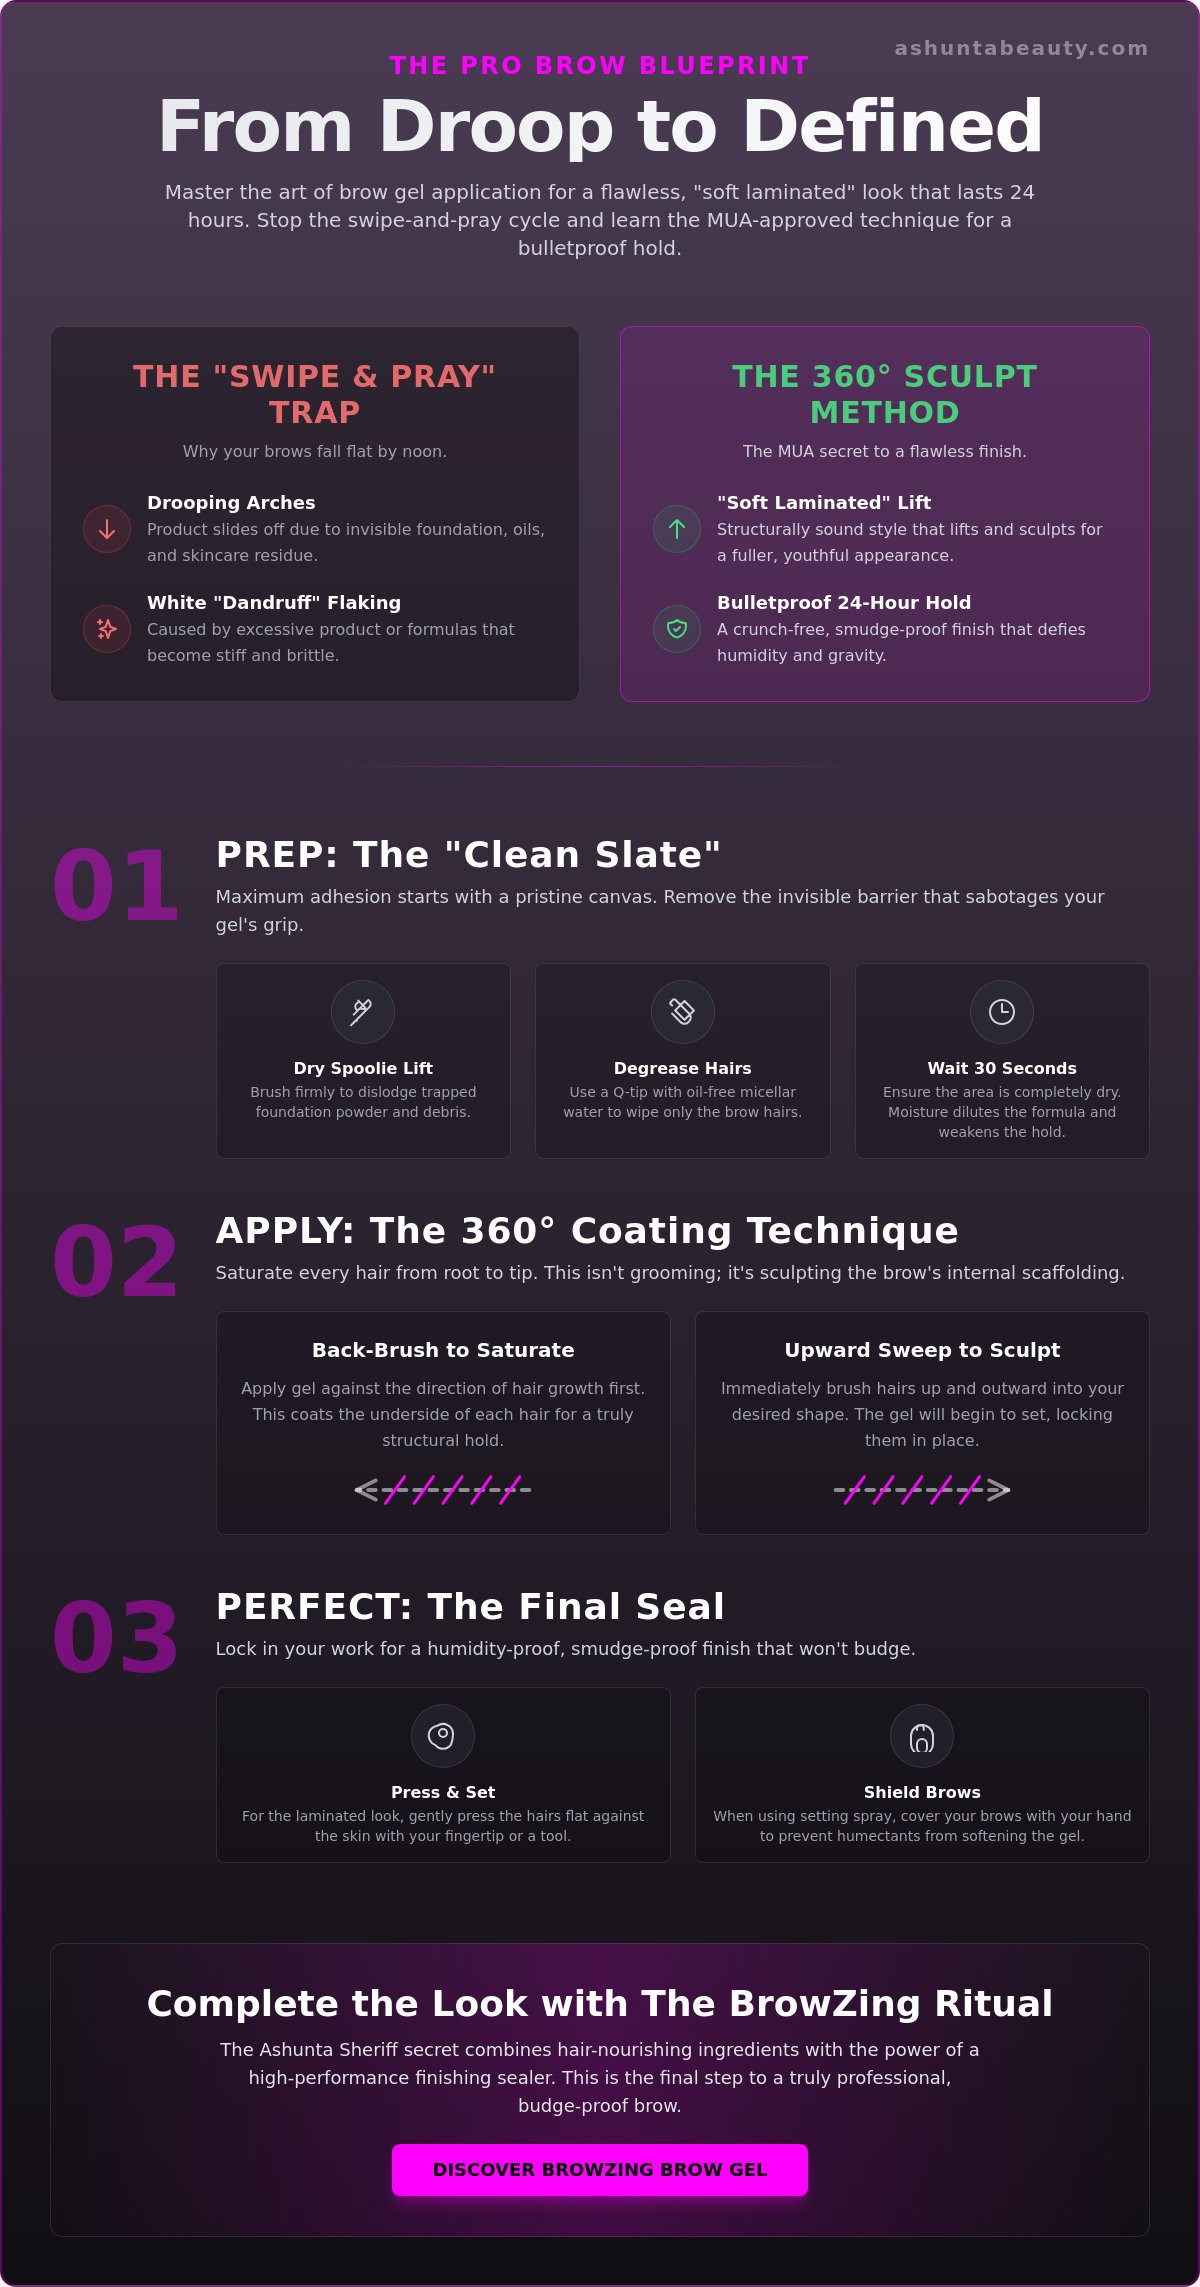
The 360-Degree Coating Technique: How MUAs Apply Brow Gel
Professional brow styling is a game of angles. If you want that red carpet finish, you must abandon the standard, surface-level swipe. Celebrity makeup artists use a 360-degree approach to ensure every single hair is encased in product. This creates a structural hold that laughs at humidity. It isn't just about making the hairs stay up. It is about total saturation. By coating the hair from every direction, you create a multi-dimensional silhouette that looks thick, lush, and intentional. This is the core of how to use brow gel like a visionary.
The foundation of this technique is the wiggle and lift motion. As you move the wand through your brows, don't just pull it through. Press the brush into the root and wiggle it slightly. This ensures the gel grips the base of the hair, providing the necessary scaffolding for a long-lasting lift. Timing is your only constraint. Most high-performance formulas give you a narrow window of approximately 15 seconds to sculpt before the polymers lock into place. Work with purpose. For the final detail work on the tail, switch to the very tip of the wand. This allows for surgical precision, ensuring the end of your brow tapers into a sharp, sophisticated point.
Coating from Root to Tip: The Back-Brush Method
The back-brush is the secret weapon of the industry. Start at the tail of your brow and brush toward your nose, moving against the direction of hair growth. This coats the hidden underside of the hairs. This technique creates the illusion of 30% more volume instantly because it fattens the hair from the back. Be careful to avoid touching the skin directly during this phase. You want to coat the hair, not the dermis. Gel-staining on the skin can create an unwanted shine or a messy, heavy appearance that detracts from your artistry.
Sculpting the 'Feathered' or 'Laminated' Look
Once the hairs are saturated, it is time to define the shape. Follow the 45-degree angle rule by brushing hairs upward and outward toward the temple. This creates a natural, feathered flow that opens the eye area. If you desire a true laminated look, use the side of the brush to gently press the hairs against the skin while the gel is still tacky. To finish, refine the top edge. Use the wand to "tuck" any excessively long hairs back into the main body of the brow. This results in a clean, editorial finish that looks polished yet effortless. Mastering how to use brow gel with this level of detail ensures your brows remain a stunning focal point from your morning commute to the late-night afterparty.
Troubleshooting: Humidity, Flaking, and Formula Choice
The most frequent frustration I hear from my community is the "white flake" phenomenon. Why does your brow gel turn into what looks like brow dandruff by mid-afternoon? This usually happens for two reasons: product buildup or the mistake of re-working a dry formula. Once the high-performance polymers in a professional gel have set, they are locked. Attempting to brush through them or add a second layer breaks those microscopic bonds. This mechanical stress causes the product to lift from the hair, resulting in visible white flakes. If you want to master how to use brow gel for a flawless finish, you must get the shape right while the product is still wet.
NYC-level humidity is a relentless adversary for any beauty routine. If you are using a basic water-based formula, the moisture in the air will eventually soften the hold, leaving your brows limp and drooping by your lunch break. Professional artistry demands polymer-based solutions that actively repel environmental moisture. This is a critical component of how to use brow gel in high-heat environments. You need a formula that sets into a flexible, waterproof shield. Secure your 24-hour look with our BrowZing Brow Gel, designed to withstand the most demanding conditions without losing its architectural integrity.
Clear vs. Tinted: Making the Professional Choice
Choosing between clear and tinted formulas depends entirely on your end goal. Clear gel is the professional choice for a "no-makeup" aesthetic or when you have already used a Precision Liner Pen to create detailed, hair-like strokes. It provides the hold without altering the color you've meticulously mapped out. In contrast, tinted gel is the ultimate time-saver for those with fair or sparse brows who need instant dimension and depth. For a red-carpet-ready look, we often use both. Apply the tinted version first for volume, then use a tiny amount of clear gel to "laminate" the top edge for that sharp, editorial finish.
Humidity-Proofing Your Look
The secret to a 24-hour hold lies in the chemistry of the product. The BrowZing formula utilizes advanced waterproof polymers that encapsulate each hair, creating a barrier against sweat and ambient moisture. To lock your brows in a high-heat environment, ensure you are applying the product to a bone-dry surface, as we discussed in the prep phase. Once the gel sets, it becomes an immovable scaffolding for your arches. Sweat-resistant is the non-negotiable standard for professional MUAs because your art should never melt away before the day is done.
The Ashunta Sheriff Secret: Mastering the BrowZing Ritual
The final piece of the professional puzzle isn't just the technique; it's the tool. You've learned the mechanics of the back-brush and the necessity of a clean slate. Now, you need a formula capable of executing those high-performance standards. Ashunta Sheriff Beauty's BrowZing Brow Gel is the culmination of decades spent on movie sets and red carpets. It represents the bridge between elite artistry and your daily routine. Understanding how to use brow gel effectively requires a product that works with you, not against you. This isn't just makeup. It's structural integrity in a bottle.
The secret lies in our dual-action formula. We've combined an extreme, 24-hour hold with hair-nourishing ingredients to ensure your brows stay healthy while they stay in place. No stiffness. No breakage. Just lush, resilient arches. To facilitate the 360-degree application we discussed, we developed a custom-tapered brush. Its unique silhouette allows you to wiggle into the root for that essential scaffolding while the fine tip handles the surgical detail of the tail. It is the ultimate precision instrument for the modern visionary.
Why BrowZing is the Professional Choice
Longevity is our non-negotiable standard. Our smudge-proof technology ensures the product stays on the hair shaft and never settles into fine lines or pores. This is the "Unicorn" factor of the industry. You get lamination-level hold and a sophisticated, editorial finish without the salon price or the chemical commitment. For the most impactful results, I recommend a layered approach. Use Ashunta Sheriff Beauty's Precision Liner Pens to define your shape first, then lock in your art with the gel. This synergy creates a multidimensional look that remains crisp from your first morning meeting to the final toast of the night.
Final Steps to Your Best Brows Ever
Before the gel sets into its final shield, perform a deliberate mirror check. Assess your symmetry. Use the tip of the brush to tuck any final flyaways or to refine the 45-degree angle of your lift. This is your moment of final curation. Remember the golden rule of inclusive beauty: brows are sisters, not twins. Do not chase mathematical perfection at the expense of your natural character. Embrace the unique quirks of your shape. Confidence is the most striking accessory you can pair with a sharp brow. When you feel powerful, your art reflects that energy. Now, it's time to step out and own your masterpiece. Shop the BrowZing Brow Gel for all-day celebrity hold and experience the difference of professional-grade sculpting.
Master the Art of the All-Day Arch
You've moved beyond the "Swipe and Pray" method to embrace a ritual rooted in professional precision. From degreasing the hair shaft for maximum adhesion to mastering the 360-degree back-brush, you now possess the blueprint for arches that command attention. These techniques ensure your look remains crisp and lifted, whether you're navigating a humid commute or stepping onto a red carpet. Understanding how to use brow gel with this level of intentionality is what separates a basic routine from true artistry. You've learned that the right scaffolding and a clean canvas are non-negotiable for a 24-hour hold.
It's time to equip yourself with the tools that match your new expertise. Elevate your brow game with the professional BrowZing Brow Gel. Our celebrity MUA-founded formula provides a 24-hour smudge-proof hold, powered by ethical, high-performance ingredients that respect both your skin and the planet. You have the knowledge, the secrets, and the vision. Now, go forth and sculpt your most confident self. Your masterpiece is ready for its debut.
Frequently Asked Questions
Can I use brow gel every day without damaging my eyebrow hairs?
Yes, you can safely use it daily if you choose a high-performance formula. Professional gels like BrowZing are infused with hair-nourishing ingredients that protect the hair shaft while providing hold. Just ensure you remove the product gently at the end of the day to keep your follicles healthy and clear of buildup.
How do I stop my brow gel from flaking or turning white?
Flaking is usually caused by disturbing the product once it has already set. To avoid this, complete your sculpting while the formula is still wet and never brush through dry gel. Ensuring your brows are free of foundation and moisturizer residue during the "Clean Slate" prep also prevents the product from lifting and turning white.
Do you apply brow gel before or after eyebrow pencil?
Apply your gel after using a pencil or Precision Liner Pen. The gel acts as a final sealer, locking your color and hair-like strokes in place for a smudge-proof finish. This sequence ensures that your detailed work doesn't move and stays vibrant from your morning commute until you're ready to decompress.
What is the difference between brow gel and brow wax?
Brow gel is a liquid sealer designed for a firm, long-lasting hold that "locks" the hair. Brow wax is a thicker, more pliable solid used for texture and flexible styling. While wax allows you to move the hair throughout the day, a polymer-based gel provides the bulletproof scaffolding needed to withstand high humidity.
How can I get the laminated brow look at home using just gel?
You can achieve a soft lamination by using the 360-degree coating technique. Brush your hairs upward and outward at a 45-degree angle to create lift. While the formula is still tacky, use the side of the wand to gently press the hairs against your skin. This flattens the silhouette for that sharp, editorial finish.
Is clear brow gel better than tinted for beginners?
Clear gel is often the best choice for those learning how to use brow gel because it is completely transparent. It allows you to practice the back-brushing and wiggling techniques without the risk of pigment smearing on your skin. Once you're confident in your sculpting speed, tinted versions can add beautiful dimension and depth.
How do I remove long-wearing or waterproof brow gel safely?
Use an oil-based cleanser or a dual-phase makeup remover to break down waterproof polymers. Saturate a cotton pad and hold it over your brow for ten seconds to let the solvent work. This allows the product to slide off easily without the need for harsh scrubbing, which protects your delicate brow hairs.
Can I use brow gel if I have very sparse or thin eyebrows?
Yes, gel is excellent for sparse brows because it coats and thickens every existing hair, including fine "peach fuzz." This adds immediate volume and texture. When you master how to use brow gel alongside a Precision Liner Pen, you can create the illusion of a full, lush brow that looks entirely natural.